Hello everyone, and welcome to the last post from this iteration of Map of the Gastronomique.
But fear not, for I've put together a new site that's a wee bit more intuitive and easier to get around than this one. Expect the usual updates every so often with the odd extra that I've not been able to do so far.
The site is still evolving, so expect a few changes now and then - and the artwork and colouring is still to happen.
But bear with me, and in a few weeks all will (hopefully) be sorted.
It's a touch sparse at the moment, but give it time and it'll be flowing with gastronomic bounty...
Come and visit the new site...
Tuesday 5 July 2011
Thursday 30 June 2011
Food Travel: Aberfeldy, Scotland
With my day off I took a trip to Aberfeldy (would have been a nightmare by public transport, but thankfully Hugh was off as well, so he was able to give me a lift on his way through to do some climbing). Aberfeldy is one of the bigger towns in the near distance from Ardeonaig and its range of shops and culinary hotspots is proportionally higher as well. Time to explore...
* * *
I'd arrived in Aberfeldy fairly early, around ten to nine. Not much was open, but after two or three wanders up and down the high street I spotted a little bakeware and cookshop that was open - Dow's. Primarily, Dow's sells cookery ware like pie tins, mixing bowls and other assorted kitchen equipment (quite a lot of Joseph Joseph stuff actually) but at the back of the shop there is also a little kitchen where the owner makes up batches of scones and other baked goods to sell front of house.

He was just loading up the Dewar's Distillery van with their allocation of scones (more on the distillery later). After he'd finished, we had a wee chat about the local area and I enquired after a Tarte Tatin dish – he had none, but did have a range of pie dishes that can be used on the hob, so I may pick one up another time. I then bought myself a scone to keep me going until some of the other shops opened up to provide a real breakfast...
It has to be said though, there's nothing quite like a warm scone straight out the oven slathered in butter and jam. A delicious way to start a day's indulgences.
Right across the road from Dow's was another tantalising prospect – and one of the few shops that was also open so early! A specialist food shop going by the name of Fields of Perth. This was one of the highlights of the day. An establishment offering a wide variety of more unusual foods (raspberry balsamic vinegar anyone?) was a most welcome surprise in such a small town.
The owner (I'm saying the owner again – I really wish I'd asked people their names! Next time...) confided that when Fields had first opened around six weeks ago their stock had included some particularly unusual items, but that this had had to be curtailed a little due to customers not knowing what to do with some of the produce on offer! It was good to see harder to get items for sale though, and I helped myself to a bundle of samphire and a bottle of white wine vinegar.

The staff were kind enough to pose for a photo behind the charcuterie counter (there's also a fantastic cheese and fish selection) and were more than friendly and helpful. I'll definitely be back when I'm looking to cook to impress...
With ten o'clock fast approaching, it was time to get some proper breakfast. I popped into one of the many cafes in the town – the Breadalbane Bakery. A full Scottish breakfast later (and a pack of Aberfeldy Oaties for later – oaties are similar to oatcakes, but thicker and sweeter) and I was ready to wander the town again.

One particular incident in the tearoom caught my ear though. One customer had asked for a breakfast, only to be asked by the lady behind the counter whether he'd like an English or Scottish breakfast. He turned and winked at the room, asking aloud "An English breakfast? Naw, ah widnae eat that!". I love Scotland. It's good to be home...
A quick look through the cookery books in the thrift shop turned up an interesting find. A fifty year old hardback called 'Larousse Treasury of Country Cooking Around the World'. It's an absolute treasure trove of unusual recipes from all over the place. I'm sure some of these will be finding their way onto the blog at some point.
My next stop was at the local whisky distillery – the world renowned Dewar's. Having never tried whisky before I wasn't really sure quite what to expect. Dewar's is still a working distillery, but they've also built a museum in part of the building that's no longer operational and run a variety of tours.
I decided to go on the cask tour, which is a little more comprehensive than the basic one. I was the only one on the tour which meant I could take it at my own pace and take everything in – it was a particularly enjoyable experience.
Opening with a ten minute mini cinema screening of the history of Dewar's and the distilling process they use to create their whisky. This was followed by a self-guided tour of the little museum in the main building. It's a fascinating place, documenting the history of the brand, the exact processes they use in the creation of the drink, and every piece of trivia and information you could ever want to know about Dewar's and whisky in general.
The museum flows through into the dramming bar where you're offered a glass of Dewar's from one of three malts and blends. The whisky is a beautiful, fruity drink with honey notes that are just stunning.
After about twenty minutes of sipping, it was on to the next part of the tour. The tour guide, Jim (finally a name!) took me round the distillery explaining all the machinery and each part of the process. With only myself on the tour, it was very personal and excellently tailored. Jim was more than capable of fielding questions, and his insightful and interesting anecdotes really helped to bring across the family atmosphere that Dewar's tries to instil in its employees (indeed, many of the staff have taken over their roles in the distillery from their parents).
After a tour of the works, I was taken out to the warehouse where a few casks are kept (though most are shipped out to Glasgow for export). Jim explained the casking process and a few other details about the warehouses before tapping one of the casks for me to taste the casked whisky (complimentary glass!). This is the drink in it's highest volume state before distilled water is added during bottling.
While the alcohol level was around 60%, the drink still retained it's beautiful flavour and aromatic nose. In fact the smell of the whole place was just incredible. Very sweet and heady.
And finally it was back to the inevitable gift shop for a last wee mill round before leaving. I picked up a book on Tommy Dewar's globetrotting marketing strategies and of course a small bottle of whisky.

By this point, Hugh had finished his climb with Kris, and the two of them met me in Aberfeldy for a coffee at the Watermill. The Watermill is 'Feldy's answer to the pretentious art meets literature meets tea and coffee establishments that are so frustratingly fashionable at the moment.
I struggle with these places because while the quality of the food and drink is usually fine, it is always so very overpriced. The atmosphere in this sort of place I always find to be a bit tedious as well – all a bit overly quiet and austere. Not my thing.
Still, one more delight was yet to come – a visit to Cones in the centre of the town. A pokey wee ice cream shop that also sells local confectionary. The ice creams are beautiful and the range includes a few Scottish themed flavours like Cranachan and Tablet. Well worth a visit on a sunny day like it was (amazingly!).

And so that was Aberfeldy, and a very pleasant experience it was. I'm sure I'll be back soon to visit Fields of Perth and to pick up that pie dish from Dow's...
* * *
Coming up:
Coming up:
- Got to make something with that samphire...
Monday 27 June 2011
Perfect Poached Eggs?
There's been a bit of discussion in the kitchen at work recently (admittedly, mostly because of me) about how to make a perfect poached egg.
You see, coking for so many means that we do things as easily and efficiently as possible in the kitchen. This is fair enough and I understand the reasoning. So we use little metal rings to hold the egg in place in a large pan full of water. Nice and simple.
But I think the look of the eggs is all wrong when it's done like this. The picture I have in my head is one of the fluffy looking, oval shaped eggs served up over an English muffin, Parma ham and covered in hollandaise sauce. Eggs Benedict of course.
***
To achieve that, I've had a good scour round the internet to see what peoples' methods are. There are a couple which are prevalent.
The first has been attributed widely to Delia Smith. She uses a technique similar to that we use in the kitchen - shallow frying the eggs in water. In Delia's case though, this is done without the aid of the metal ring. Results from this technique seem to be sketchy at best though, and as it's similar to what we already do I thought I'd look a little further.
The other method which I've seen a few times is most often referred to as the vortex method - and it's this one that I had a go at.
The idea is to crack your egg into a shallow bowl or cup while your water gets up to the boil.
Once your water is at a rolling boil, take a whisk and rapidly stir the water until you have a whirlpool in the middle of your pan. Drop the egg into the centre of the 'vortex' and the yolk should stay fairly steady while the white is pulled round it to form the poached egg.
 The technique is difficult at best though. I had five goes before I managed to make an egg that I was vaguely pleased with. If the water is spinning too fast then fragments of the white start to spin off and the egg loses it's shape. Too slow and you end up with the egg sitting at the bottom of the pan and frying off in the water.
I think I'm getting closer though. Maybe a few more tries and I'll crack it - pardon the pun!
For now though, five goes is quite enough.
 ***
***
What I am wondering though, is whether or not anyone has any other methods for poaching eggs, or a little tweak to the 'vortex' method above that might help?
Any suggestions are welcome!
***
Coming up:
- Same as last time!
You see, coking for so many means that we do things as easily and efficiently as possible in the kitchen. This is fair enough and I understand the reasoning. So we use little metal rings to hold the egg in place in a large pan full of water. Nice and simple.
But I think the look of the eggs is all wrong when it's done like this. The picture I have in my head is one of the fluffy looking, oval shaped eggs served up over an English muffin, Parma ham and covered in hollandaise sauce. Eggs Benedict of course.
***
To achieve that, I've had a good scour round the internet to see what peoples' methods are. There are a couple which are prevalent.
The first has been attributed widely to Delia Smith. She uses a technique similar to that we use in the kitchen - shallow frying the eggs in water. In Delia's case though, this is done without the aid of the metal ring. Results from this technique seem to be sketchy at best though, and as it's similar to what we already do I thought I'd look a little further.
The other method which I've seen a few times is most often referred to as the vortex method - and it's this one that I had a go at.
The idea is to crack your egg into a shallow bowl or cup while your water gets up to the boil.
Once your water is at a rolling boil, take a whisk and rapidly stir the water until you have a whirlpool in the middle of your pan. Drop the egg into the centre of the 'vortex' and the yolk should stay fairly steady while the white is pulled round it to form the poached egg.

I think I'm getting closer though. Maybe a few more tries and I'll crack it - pardon the pun!
For now though, five goes is quite enough.

What I am wondering though, is whether or not anyone has any other methods for poaching eggs, or a little tweak to the 'vortex' method above that might help?
Any suggestions are welcome!
***
Coming up:
- Same as last time!
Sunday 26 June 2011
Pete Hardiman's Lemon Drizzle Cake
A wee update from the land of cookery for you to enjoy. This time I didn't do any of the cooking though, but I thought that to keep the blog ticking over I'd put up a piece on one of the other residents of Seon Na Glen, Pete, who baked a lemon drizzle cake today...
***
For the cake you will need:
- 225g self raising flour
- 225g caster sugar
- 225g butter
- 4 eggs
- 1 lemon
- 50g icing sugar
First beat the flour, sugar, butter and eggs together. The lovely Pete is demonstrating here.
 Grate in the rind of the lemon (making sure to avoid the pith) before mixing the batter quite thoroughly again to distribute the zest throughout. While grating, it is always a good idea to wear pink Crocs.
 Pour the finished batter into a greased cake tin.
Put the cake into an oven that has been preheated to 180°C and bake for around half an hour.
Once the cake has baked, remove it from the oven and allow to sit for a few minutes. Once slightly cooled, prick it all over with a fork to allow you to pour over the lemon drizzle.
To make the drizzle, combine the juice from the lemon with the icing sugar. Mix it together well.
 Pour on the drizzle before allowing the cake to cool completely. Slice and serve!

***
Coming up:
- Still working on that Christmas menu...
- Back down to England for a week in August and I have a couple of plans for some blogs that'll result from that week.
***
For the cake you will need:
- 225g self raising flour
- 225g caster sugar
- 225g butter
- 4 eggs
- 1 lemon
- 50g icing sugar
First beat the flour, sugar, butter and eggs together. The lovely Pete is demonstrating here.


Put the cake into an oven that has been preheated to 180°C and bake for around half an hour.
Once the cake has baked, remove it from the oven and allow to sit for a few minutes. Once slightly cooled, prick it all over with a fork to allow you to pour over the lemon drizzle.
To make the drizzle, combine the juice from the lemon with the icing sugar. Mix it together well.


***
Coming up:
- Still working on that Christmas menu...
- Back down to England for a week in August and I have a couple of plans for some blogs that'll result from that week.
Tuesday 21 June 2011
Drunken Pineapple And Strawberries
Hello folks. It's been a fair wee while since the last blog, and to be honest, I think it'll be this way from now until I finish with this job.
With a lack of mobility, and the fact that all my meals are provided, then the ability to get ingredients and the need to cook (other than at work) has been greatly reduced. But, like today, when I do occasionally put something together I'll let you know...
***
Unfortunately, the internet up here is still absolutely dire, so again I've only managed to get a couple of pictures up. Hope that's alright!
I made a few mistakes in putting together this dish - primarily not consulting a few recipes beforehand to get an idea of what I was doing - but it came out okay. And I'll put a couple of markers down as to how to do it better...
You will need (serves about six):
- 1 pineapple
- 20 to 30 strawberries
- 50g sugar
- 50g butter
- 1 glass white wine
I used a glass of wine, but really that was too much. A few tablespoons would have been more than adequate. You really just want to make a glaze for the fruit, but I ended up with something more akin to punch - though it still tasted pretty good.
 Start by melting the butter and sugar together to form a little caramel. Then fry your fruit (I used pineapple and strawberry, but really anything works. Drunken plantain is popular, and for that you substitute the wine for rum) in it for around five minutes at a fairly high heat.
Bring down the heat after the fruit is cooked through and add the wine to the pan. Bring up to simmering point and slowly cook off the alcohol for around ten minutes until just the flavour of the wine comes through.
 And that is that. Very simple, very quick, but very tasty too. Like I say, bringing down the amount of alcohol you use will mean that you get a glaze on the fruit rather than a very thin sauce, which would be much better. Also, strawberries don't hold their shape after a lot of cooking, but they do colour the sauce very well. Again, reducing the amount of wine in the dish would mean that cooking off the alcohol would take less time and the strawberries would have come out better. But you live and learn - experiment a little and enjoy!
***
Coming up:
- I'm going to try to get hold of some chicken livers from the butcher at some point.
- Also got my Christmas menu nearly sorted - will be starting the Christmas cake at the start of September!
With a lack of mobility, and the fact that all my meals are provided, then the ability to get ingredients and the need to cook (other than at work) has been greatly reduced. But, like today, when I do occasionally put something together I'll let you know...
***
Unfortunately, the internet up here is still absolutely dire, so again I've only managed to get a couple of pictures up. Hope that's alright!
I made a few mistakes in putting together this dish - primarily not consulting a few recipes beforehand to get an idea of what I was doing - but it came out okay. And I'll put a couple of markers down as to how to do it better...
You will need (serves about six):
- 1 pineapple
- 20 to 30 strawberries
- 50g sugar
- 50g butter
- 1 glass white wine
I used a glass of wine, but really that was too much. A few tablespoons would have been more than adequate. You really just want to make a glaze for the fruit, but I ended up with something more akin to punch - though it still tasted pretty good.

Bring down the heat after the fruit is cooked through and add the wine to the pan. Bring up to simmering point and slowly cook off the alcohol for around ten minutes until just the flavour of the wine comes through.

***
Coming up:
- I'm going to try to get hold of some chicken livers from the butcher at some point.
- Also got my Christmas menu nearly sorted - will be starting the Christmas cake at the start of September!
Monday 13 June 2011
Roast Chicken With Vegetable Risotto
Hello folks! You're long overdue an update, so here's a little one to keep the tastebuds tickled. Enjoy...
***
Sunday afternoon - post church, or work, or whatever you've got on - has long been associated in the UK with the roast dinner. And it's no exception here in Ardeonaig. A bunch of the folk from the centre came to Seon Na Glen for a roast that Cardo and I had put together for them. To be fair, Cardo made the roast (and it was good!) and I put together the risotto.
I'm not sure exactly what flavouring went into Cardo's chicken, but it was very well seasoned. He made sure to baste it regularly while it roasted. Bacon between the skin and breast of the chicken - a wonderful touch.
For the risotto you will need (serves 6):
300g rice (risotto rice is preferable, but we didn't have any - long grain came out okay)
1l vegetable stock
3 slices of bacon
100g baby sweetcorn
100g sugar snap peas
Get yourself a thick bottomed pan and put the rice into it. Crack up the heat and start to add your stock a bit at a time. Make sure to stir constantly as the rice absorbs the liquid. This will help the rice to release starch and give the creamy texture desired from a risotto.
Slice up the bacon into strips and fry it off in a little butter. Also boil the baby sweetcorn and peas - but only for a few minutes. Enough to cook the veg, but not enough to cause them to lose their texture.
When the risotto is almost done, stir through the veg and bacon until it's well mixed together. You now have the base for your chicken - just carve it up and place on top!
Here's some of the group enjoying dinner...
 Cardo also finished off the meal with a pear crumble. Superb.
 ***
***
After everyone had gone, I took the chicken carcass, a few herbs and spices and boiled it up in a litre and a half of water for three hours to create some stock. The seasoning on the chicken helped to flavour the stock too. Sadly I didn't have any root vegetables around - maybe some carrot would have been good. But I now have some stock, maybe for some soup or some sauces... I'm sure I'll use it in an upcoming blog.
 ***
***
Coming up:
- Might get up to something on my days off. Eyes peeled...
***
Sunday afternoon - post church, or work, or whatever you've got on - has long been associated in the UK with the roast dinner. And it's no exception here in Ardeonaig. A bunch of the folk from the centre came to Seon Na Glen for a roast that Cardo and I had put together for them. To be fair, Cardo made the roast (and it was good!) and I put together the risotto.
I'm not sure exactly what flavouring went into Cardo's chicken, but it was very well seasoned. He made sure to baste it regularly while it roasted. Bacon between the skin and breast of the chicken - a wonderful touch.
For the risotto you will need (serves 6):
300g rice (risotto rice is preferable, but we didn't have any - long grain came out okay)
1l vegetable stock
3 slices of bacon
100g baby sweetcorn
100g sugar snap peas
Get yourself a thick bottomed pan and put the rice into it. Crack up the heat and start to add your stock a bit at a time. Make sure to stir constantly as the rice absorbs the liquid. This will help the rice to release starch and give the creamy texture desired from a risotto.
Slice up the bacon into strips and fry it off in a little butter. Also boil the baby sweetcorn and peas - but only for a few minutes. Enough to cook the veg, but not enough to cause them to lose their texture.
When the risotto is almost done, stir through the veg and bacon until it's well mixed together. You now have the base for your chicken - just carve it up and place on top!
Here's some of the group enjoying dinner...


After everyone had gone, I took the chicken carcass, a few herbs and spices and boiled it up in a litre and a half of water for three hours to create some stock. The seasoning on the chicken helped to flavour the stock too. Sadly I didn't have any root vegetables around - maybe some carrot would have been good. But I now have some stock, maybe for some soup or some sauces... I'm sure I'll use it in an upcoming blog.

Coming up:
- Might get up to something on my days off. Eyes peeled...
Friday 3 June 2011
Food Travel: Killin, Scotland
I've been working in the Ardeonaig kitchen now for about a week. I took advantage of a day off yesterday, taking a wee trip to the local village, Killin, to have a look around and see what culinary offerings my new surroundings have to offer...
Killin, like most rural Scottish villages, seems to rely heavily on tourism for its income. To this end there are a plethora of little B&Bs, hotels, and all of these have catering facilities or an attached restaurant (indeed one such establishment was proudly proclaiming that it sold Mackie's ice cream within. If you haven't tried it, do - second only to Nardini's in Largs or Soave's in Baillieston).
 But I was looking for stand alone food places - just a restaurant, just a cafe. That type of thing.
The only restaurant worth mentioning (and it barely is...) is Shutters in the village centre.
 The only reason I call it a restaurant is because that is what they have deemed to title the place, though it really is no more than a glorified (and expensive!) cafe. While I'm sure that the food is probably fine (though the prices were enough to keep me out), and the staff are more than likely wonderfully friendly (as are all the Killin folk I've spoken to), it really is going too far to label Shutters as a restaurant.
There are a couple of little cafes or bakeries, but the one that caught my eye was The Wee Bake Shop, a tin building near the top of the village. The place really was a testament to just what can be done with a pie.
 From macaroni filling to the traditional Scotch pie and everything in between! I went for a thoroughly delicious steak and haggis pie and a can of Irn-Bru, naturally. The steak seemed to be decent quality meat and the haggis was fantastic.
 They also had a range of other traditional baked goods like Bridies, as well as a few other wee bits and pieces. A great wee place - and cheap! - that I'm sure will become a fixture in my future visits to Killin.
There is also a little fishmonger and fruiterer which is a fantastic find, and I'm sure I'll be putting it to good use in the near future.
 One other little gem I wanted to share was an interesting fish and chip vendor at the bottom end of the village. Make of it what you will...
 Curious, eh? I've yet to see it open, but it doesn't look particularly disused. Maybe I'll try it out one day.
As I've mentioned already, Killin is a rural village and very tiny. And with most shops given over to tourism, the other 'real' shops all become general stores - selling a bit of everything! This can certainly be advantageous. I popped into the fine arts shop which doubles as a used book shop (of course) and managed to pick up a copy of Raymond Blanc's "Cooking For Friends" for fifty pence.
 He looks rather younger on the cover here than he does today. What a purchase to end my trip to Killin on! Maybe it won't be so bad here...
***
Coming up:
- I'll keep you posted when I can...
***

The only restaurant worth mentioning (and it barely is...) is Shutters in the village centre.

There are a couple of little cafes or bakeries, but the one that caught my eye was The Wee Bake Shop, a tin building near the top of the village. The place really was a testament to just what can be done with a pie.


There is also a little fishmonger and fruiterer which is a fantastic find, and I'm sure I'll be putting it to good use in the near future.


As I've mentioned already, Killin is a rural village and very tiny. And with most shops given over to tourism, the other 'real' shops all become general stores - selling a bit of everything! This can certainly be advantageous. I popped into the fine arts shop which doubles as a used book shop (of course) and managed to pick up a copy of Raymond Blanc's "Cooking For Friends" for fifty pence.

***
Coming up:
- I'll keep you posted when I can...
Thursday 2 June 2011
Millionaire's Shortbread
Welcome to my first blog from Ardeonaig! Different kitchen surroundings in the pictures – variation of the highest order. No expense spared in bringing you a fantastic blogging experience. And especially not today, when the haute cuisine on offer is the most superb and unsurpassable of biscuits – the millionaire's shortcake.
If you're unfamiliar with this confectionary (it is also known as caramel shortcake or caramel shortbread), it is very simple, but delicious. A shortbread base has a thick layer of caramel smothered on top of it before a layer of melted chocolate is applied and allowed to set. A marvel of baking goodness.
Let's just hope it survives the postal journey it's making this week – I'm sending it down to some friends in England...
***
You will need:
200g butter
100g caster sugar
400g plain flour
2 tins condensed milk
200g plain chocolate
Start by boiling up your tins of condensed milk for a couple of hours as seen in my blog for banoffee pie. Remember to keep your pan topped up with water to avoid any unwanted tin explosions!

When there's about half an hour left for the caramel, cream together your butter and sugar in a bowl before folding in the flour. Make sure it's well kneaded.

You then want to take your dough and press it into the bottom of a greased ovenproof dish or swiss roll tin to a thickness of about half a centimetre or so. Allow this to bake in the oven at about 180°C for twenty minutes or so – until the biscuit has turned a golden colour and is now crisp and crumbly.

Remove your caramel from the pan carefully and pour it onto your biscuit. Spread thickly but evenly. Set it to the side to cool for an hour or so.

Finally, melt your chocolate in a bowl over a pan of simmering water. When the caramel is set, it should set thick enough that your chocolate can be poured over the top. Again, set this to the side to allow the chocolate to resolidify.

Once it's thoroughly cooled, cut it into squares to serve and enjoy! Unfortunately, with my haste to get the biscuits into the post, I forgot to take a shot of the finished product. But I'm sure you should know what it'll look like... and I'm slightly doubtful that it'll resemble what it should when it's gone through the postal system!

And don't forget to put your cut-offs in the staff lounge. Guaranteed to make you popular...
***
Coming up:
- A look at Killin, the local village, and the culinary delights it has to offer.
Tuesday 31 May 2011
In The Dead Zone
Hello everyone! Over dramatic title for this blog perhaps. Allow me to explain...
The internet at Ardeonaig is very slow and sometimes unavailable altogether. Long working days also mean that I might not be cooking as often as I have been at home - all our meals are provided here.
As such, I may update a bit less than I have been, but I will still be trying to put something on here at least a couple of times a month.
Be reassured, there is a proper blog in the pipeline, and when I manage to get out to the local shop (8 miles away...) I'll be getting some of the ingredients I need. Hopefully by the end of this week the next blog will be up.
Hang tight!
Monday 23 May 2011
Tarte Tatin
With the move imminent, most of my kitchen stuff has been packed away now. However that hasn't given me any less of an inclination to cook... so I had a wee go at an improv Tarte Tatin with the limited equipment I still have out.


Because of the lack of equipment, I didn't make my own puff pastry (sorry!) and I was trying to keep things as simple as possible. I'll make some up at some point for another recipe I'm sure.
I also didn't take a lot of pictures - only really of the finished article - as I wasn't intending to blog this. But now I am. So there.
***
To make one nine inch tart you will need:
- 120g caster sugar
- 50ml water
- 50g unsalted butter
- 1kg apples
- 300g puff pastry
Not having a Tarte Tatin dish, I used a nine inch cake tin with fairly shallow sides. This seemed to work just fine, though it does mean that the caramel has to be made up in a separate pot.
Start by peeling the apples, coring them and then slicing them into segments. Put these to the side while you turn your attention to the caramel. To stop the apples browning while they wait, apply lemon juice to the blade of the knife you're cutting with - the reaction of the acid in the lemon keeps the flesh of the apple that contacted the blade fresh.
For the caramel, put the water and sugar into a pan and allow the water to absorb the sugar before putting it on the hob. Then gently heat the mixture until all the sugar has dissolved. Remove the pan from the heat and stir in the butter.
Pour your caramel into the Tatin dish or cake tin and allow it to settle before arranging the apple slices. Make sure that there are no gaps between the apples and press them down to wedge them into place.
Melt a little extra butter and brush this onto the apples before putting the tin into the oven for half an hour at 180°C.
While the apples cook, turn your attention to the puff pastry. If you decide to make your own, prepare it well in advance. Otherwise, just roll out the dough and cut yourself a circle that is only slightly bigger than the size of your cake tin (or Tatin dish).
Once the apples have been in for half an hour, take them out and put the pastry disc over the top of your tin. Tuck the overhanging pastry down the side of the apples to form a lip round the outside of the filling. Put this back into the oven for about 40 minutes - until the pastry has risen, crisped and browned.

It is now ready to turn out and serve - pretty good with a dollop of crème fraiche.

***
Coming up:
- With a few more days before I move, I'm sure I'll cook something else... we'll see.
Thursday 19 May 2011
Black Forest Yoghurt Cake
**Edit: Since posting this, I have managed to salvage a picture of the cake - only one - but hey. It's something.**
So I've had my first David Disaster for a little while. Thankfully it's not so much to do with the food I've made this time... More just that I dropped my camera on my way through to the PC and it formatted the memory card. So I have no pictures of my cake to share!
 Anyway, on to the cake...
***
Yoghurt cake is one of the recipes that I've used a few times - one of the first ones that I remember mum showing me how to make. Mum tends to make orange or toffee flavour.
Having passed on the recipe to me, I then passed it on to a colleague at work a couple of years ago. She experimented with it by using cherry yoghurt instead of orange or toffee and also added cocoa powder to the ingredients to make a chocolate and cherry cake.
After a wee chat with Heather from work today, talking about how the recipe could be furthered again, I decided to have a crack at a sort of faux black forest gâteau. Here's how...
***
You will need:
- 3 cups self raising flour
- 1 cup caster sugar
- 1/2 cup cocoa powder
- 1 egg
- 1 pot cherry yoghurt
- 1 cup oil
- 1 tin cherries in syrup
- 300ml double cream
Yoghurt cake is a spectacularly easy cake to put together - one of my favourites as you can do everything in practically one bowl.
With the modifications for the 'black forest' version, it needs a little more work, but still very easy.
First, grease a 1lb loaf tin and preheat the oven to 180°C.
Then grab a large mixing bowl and mix all the dry ingredients (flour, sugar and cocoa powder) into it, making a well in the middle. This is where a picture might be handy, but I'm sure you see what I'm saying.
Add the yoghurt, oil and egg into the well and fold the dry ingredients into the middle from the outside, combining everything together. Start to work the mixture faster once the batter starts to come together. Make sure that no lumps are present when you've finished beating the mixture.
Pour the cake batter into your loaf tin and put it in the oven for about half an hour or so.
While the cake is baking, whisk the cream in a bowl until it's very thick. Set this in the fridge until you're ready to use it later.
Once the cake is baked, take it out the oven and leave it to cool for a while in the loaf tin. Once the cake has cooled completely, turn it out of the tin and slice it in half lengthways, leaving you with two layers.
Take your cream from the fridge and put it into an icing bag. Pipe half the cream onto the bottom layer of the cake.
Take a spoon and dig a trench into the top layer of the cake, making sure to leave enough of a wall round the edge to contain a reasonable amount of filling. Once carved, set the top layer onto the bottom layer before spooning your cherry filling into the cavity.
You could use fresh cherries, cooking them down with sugar, water and a little lemon juice, but for the sake of economy I used a tinned version.
Finally, pipe the rest of the cream onto the top of the cake, covering the cherries completely.
And serve...
***
Below is the picture I managed to salvage. It's the cake before the cream has been piped over the cherries. Not a brilliant picture, but the best I can do!
 ***
***
My apologies again for the lack of pictures here, but for those of you from work who read this you'll get a chance to see it tomorrow anyway.
I will admit just now that I was a little over enthusiastic when carving the top of the cake and it's collapsed somewhat. Currently being held together with tinfoil... We'll see how it's doing in the morning.
***
Coming up:
- Who knows...
So I've had my first David Disaster for a little while. Thankfully it's not so much to do with the food I've made this time... More just that I dropped my camera on my way through to the PC and it formatted the memory card. So I have no pictures of my cake to share!

***
Yoghurt cake is one of the recipes that I've used a few times - one of the first ones that I remember mum showing me how to make. Mum tends to make orange or toffee flavour.
Having passed on the recipe to me, I then passed it on to a colleague at work a couple of years ago. She experimented with it by using cherry yoghurt instead of orange or toffee and also added cocoa powder to the ingredients to make a chocolate and cherry cake.
After a wee chat with Heather from work today, talking about how the recipe could be furthered again, I decided to have a crack at a sort of faux black forest gâteau. Here's how...
***
You will need:
- 3 cups self raising flour
- 1 cup caster sugar
- 1/2 cup cocoa powder
- 1 egg
- 1 pot cherry yoghurt
- 1 cup oil
- 1 tin cherries in syrup
- 300ml double cream
Yoghurt cake is a spectacularly easy cake to put together - one of my favourites as you can do everything in practically one bowl.
With the modifications for the 'black forest' version, it needs a little more work, but still very easy.
First, grease a 1lb loaf tin and preheat the oven to 180°C.
Then grab a large mixing bowl and mix all the dry ingredients (flour, sugar and cocoa powder) into it, making a well in the middle. This is where a picture might be handy, but I'm sure you see what I'm saying.
Add the yoghurt, oil and egg into the well and fold the dry ingredients into the middle from the outside, combining everything together. Start to work the mixture faster once the batter starts to come together. Make sure that no lumps are present when you've finished beating the mixture.
Pour the cake batter into your loaf tin and put it in the oven for about half an hour or so.
While the cake is baking, whisk the cream in a bowl until it's very thick. Set this in the fridge until you're ready to use it later.
Once the cake is baked, take it out the oven and leave it to cool for a while in the loaf tin. Once the cake has cooled completely, turn it out of the tin and slice it in half lengthways, leaving you with two layers.
Take your cream from the fridge and put it into an icing bag. Pipe half the cream onto the bottom layer of the cake.
Take a spoon and dig a trench into the top layer of the cake, making sure to leave enough of a wall round the edge to contain a reasonable amount of filling. Once carved, set the top layer onto the bottom layer before spooning your cherry filling into the cavity.
You could use fresh cherries, cooking them down with sugar, water and a little lemon juice, but for the sake of economy I used a tinned version.
Finally, pipe the rest of the cream onto the top of the cake, covering the cherries completely.
And serve...
***
Below is the picture I managed to salvage. It's the cake before the cream has been piped over the cherries. Not a brilliant picture, but the best I can do!

My apologies again for the lack of pictures here, but for those of you from work who read this you'll get a chance to see it tomorrow anyway.
I will admit just now that I was a little over enthusiastic when carving the top of the cake and it's collapsed somewhat. Currently being held together with tinfoil... We'll see how it's doing in the morning.
***
Coming up:
- Who knows...
Monday 16 May 2011
Pistachio Soufflé
Having been inspired by the wonderful culinary works of Raymond Blanc the other day, I thought I should have a go at the pistachio soufflé which was by far the showpiece of the Brasserie. I had a couple of able accomplices in my good friends Deon and Alta. Though Deon turned out to be a bit useless. Not really. Well, a little bit.
***
I couldn't find a recipe I liked for the dish. I was looking to at least vaguely recreate Raymond's soufflé, but none of the pistachio recipes seemed to be quite right. In the end I modified a chocolate soufflé recipe to suit.
You will need (3 soufflés):
- 150ml double cream
- 75ml milk
- 2 egg yolks
- 90g caster sugar
- 3/4tbsp cornflour
- 3 egg whites
- 45g pistachios
- Icing sugar to dust
- Butter to grease the ramekins
- Cocoa powder to dust
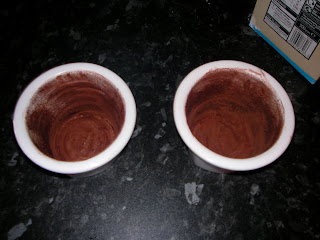
Start by preheating the oven to 220°C. Then grease your ramekins with the butter before coating them with cocoa powder. Shake out any excess powder. I'm fairly sure this is what Raymond will have done with the ones we ate in the restaurant - there was a thin coating of chocolate round the outside of the soufflé when it had risen, and I'm sure this is how he did it.
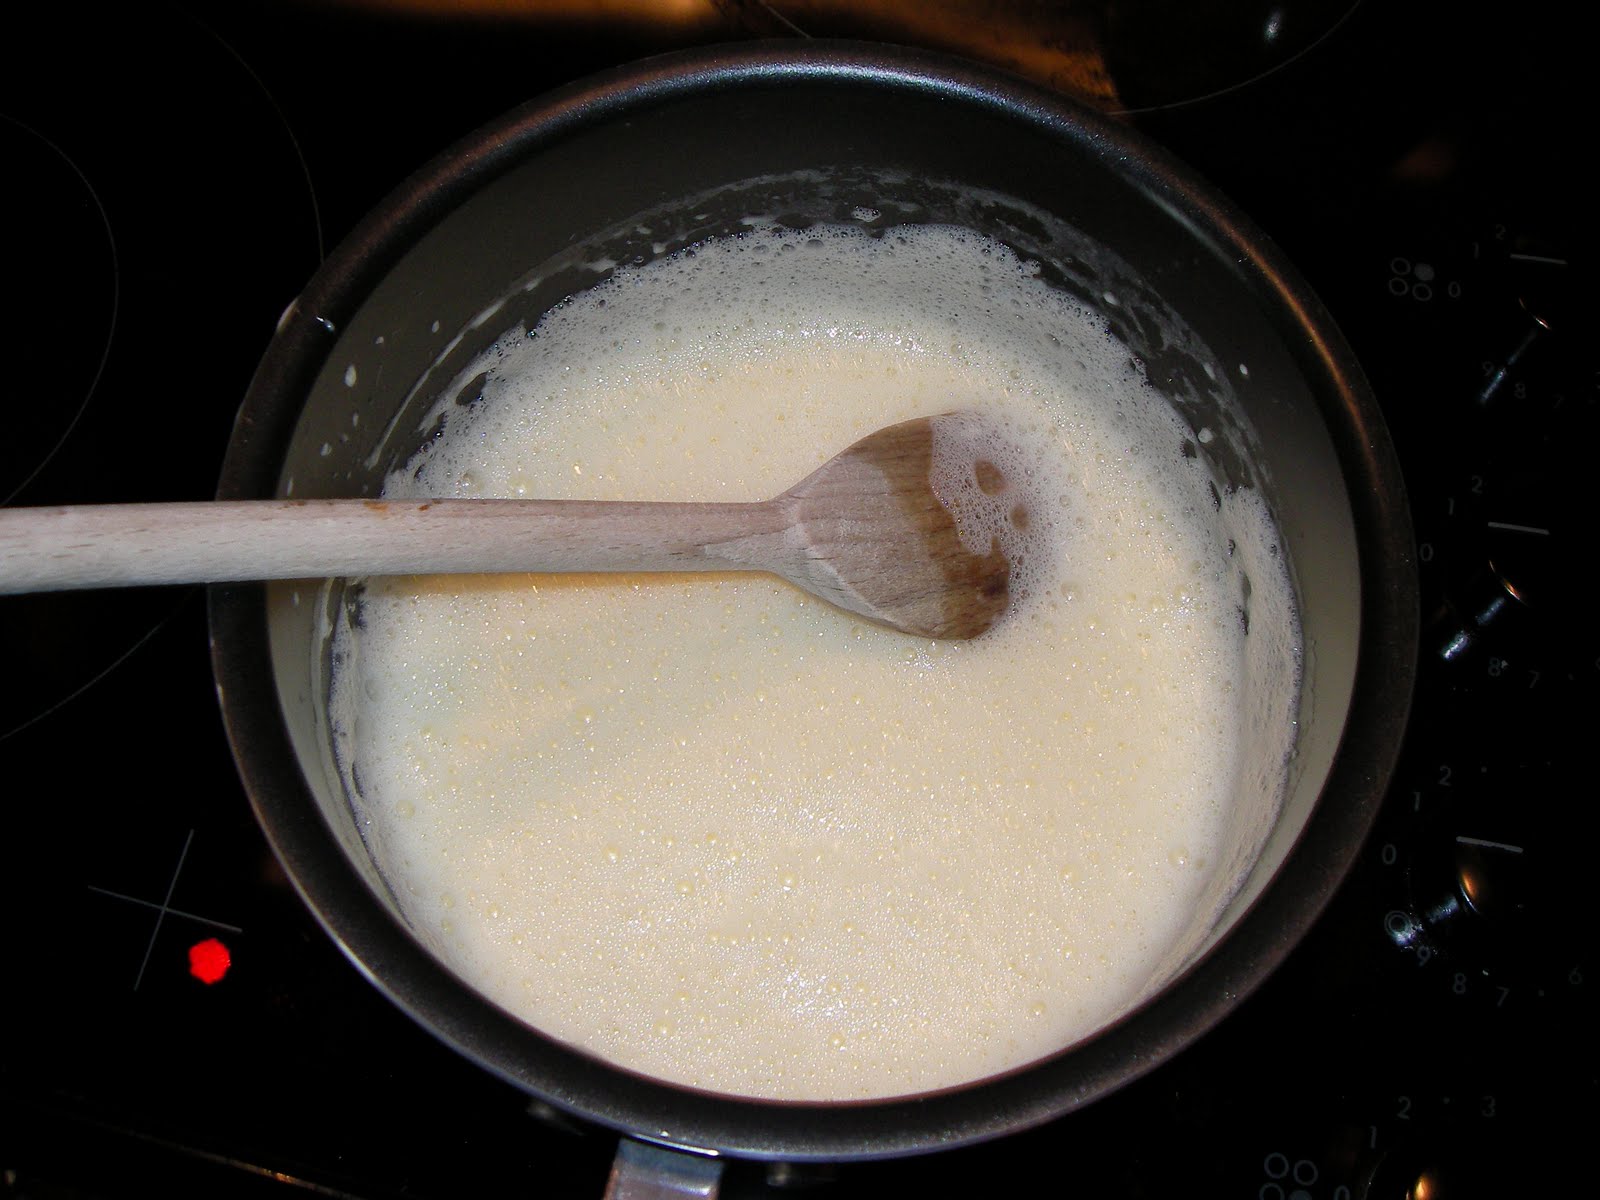
 The next step is to boil up the milk and cream. While they're heating together, whisk up the egg yolks and half the sugar until they're pale and well combined. No lumps!
Once the cream and milk has boiled, whisk in your egg yolk mixture and then lower the heat on the pan.
 Stir well and then add in the cornflour, again stirring well to ensure there are no lumps. Let this thicken a little and you have the custard base for your soufflé!
We set Deon to work grinding up the pistachios. Raymond's soufflé didn't seem to have any pieces of pistachio in at all, and to be perfectly honest I'm not sure how he got the flavour and colour so perfect without adding any pieces to the mixture. Perhaps extract from the nuts. Unfortunately this is something I don't have access to, so instead I just used my cocoa bean grinder to get the nuts as small as possible. Almost to a praline type paste.
 Deon was working so hard that he even had time for a coffee. And managed to spill the pistachio everywhere. But that's okay - mine is a forgiving kitchen.
While the pistachios were being ground and spilled, Alta whisked up the egg whites, adding the rest of the sugar and whisking again once stiff peaks formed when the whisk was removed.
 With the custard off the heat, fold in the egg whites, mixing the two together well without losing any air or volume from the mixture. Fold in the ground pistachios too and spoon the mixture into the ramekins before putting them into the oven.
 After ten minutes, the soufflés should have risen well and browned at the top. The chocolate around the sides will have melted and risen with the soufflé giving it a sticky, chocolatey coating round the outside.
Quickly move the ramekins onto plates and dust the top of the soufflés with icing sugar before they start to collapse. Serve immediately!
 I certainly didn't attain the standard of dessert that we got from Brasserie Blanc, but for a first attempt it certainly wasn't bad. Even though the pistachios were ground very finely there was still a little crunch that took away from the overall texture. I perhaps should have left them in the oven a little longer as well, but overall not too bad. I got a good green colour to the centre of the soufflé and the chocolate worked very well.
 A few minor tweaks and I'll be in business.
Thanks again to Deon, Alta and Josh for another lovely evening. I haven't mentioned Josh 'til now, but he was there.
***
Just wanted to share a few of the little blessings I've received from some of my lovely friends as going away presents recently to show my appreciation for these wonderful people. All culinary themed gifts... you'd think I was going to do a job in cooking or something...
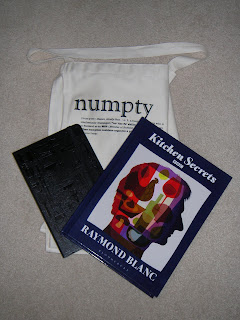 A Scottish slang apron from Lynda, bearing more than just the word numpty. Honest. Something to wear in the home kitchen up north as I'm sure they won't allow it at work...
Also a little Moleskine recipe journal from Kym-Marie. A beautiful little book for taking notes on food, recipes, all the stuff I'll want to be taking notes on.
And finally Raymond Blanc's Kitchen Secrets recipe book from Liz. A fantastic recipe book and a wee reminder of a great night out with some of my best friends.
Thank you everyone for all the love and support you've shown me before the move!
***
Coming up:
- Back to not sure. No plans at the moment - see how the next week pans out...
- I think this blog is going to go through with no formatting issues. Hooray.
***
I couldn't find a recipe I liked for the dish. I was looking to at least vaguely recreate Raymond's soufflé, but none of the pistachio recipes seemed to be quite right. In the end I modified a chocolate soufflé recipe to suit.
You will need (3 soufflés):
- 150ml double cream
- 75ml milk
- 2 egg yolks
- 90g caster sugar
- 3/4tbsp cornflour
- 3 egg whites
- 45g pistachios
- Icing sugar to dust
- Butter to grease the ramekins
- Cocoa powder to dust
Start by preheating the oven to 220°C. Then grease your ramekins with the butter before coating them with cocoa powder. Shake out any excess powder. I'm fairly sure this is what Raymond will have done with the ones we ate in the restaurant - there was a thin coating of chocolate round the outside of the soufflé when it had risen, and I'm sure this is how he did it.

Once the cream and milk has boiled, whisk in your egg yolk mixture and then lower the heat on the pan.
We set Deon to work grinding up the pistachios. Raymond's soufflé didn't seem to have any pieces of pistachio in at all, and to be perfectly honest I'm not sure how he got the flavour and colour so perfect without adding any pieces to the mixture. Perhaps extract from the nuts. Unfortunately this is something I don't have access to, so instead I just used my cocoa bean grinder to get the nuts as small as possible. Almost to a praline type paste.

While the pistachios were being ground and spilled, Alta whisked up the egg whites, adding the rest of the sugar and whisking again once stiff peaks formed when the whisk was removed.


Quickly move the ramekins onto plates and dust the top of the soufflés with icing sugar before they start to collapse. Serve immediately!


Thanks again to Deon, Alta and Josh for another lovely evening. I haven't mentioned Josh 'til now, but he was there.
***
Just wanted to share a few of the little blessings I've received from some of my lovely friends as going away presents recently to show my appreciation for these wonderful people. All culinary themed gifts... you'd think I was going to do a job in cooking or something...

Also a little Moleskine recipe journal from Kym-Marie. A beautiful little book for taking notes on food, recipes, all the stuff I'll want to be taking notes on.
And finally Raymond Blanc's Kitchen Secrets recipe book from Liz. A fantastic recipe book and a wee reminder of a great night out with some of my best friends.
Thank you everyone for all the love and support you've shown me before the move!
***
Coming up:
- Back to not sure. No plans at the moment - see how the next week pans out...
- I think this blog is going to go through with no formatting issues. Hooray.
Sunday 15 May 2011
Luke's Microwave Corner: Potato Bake
NB: My apologies for the odd formatting on the last couple of blogs. Especially concerning the picture spacing. Blogger has had some technical issues recently and this seems to be one of the side effects. I could go and edit the HTML, but that would require copious amounts of work on my part as the coding is horrible for a start, and I'm also not the best at that sort of work anyway. So please bear with me in the meantime...
Avid readers (are there any?) might remember that I mentioned the possibility of a remote contributor to the blog. And if you don't remember, you can see for yourself by having a look at the 'Coming up' section of this blog.
Remote is probably the wrong word to use right at the moment as I'm still living in Witney, however once I move away it will definitely be a remote contribution!
All that to say that Luke is occasionally going to pop a recipe on here when he gets his act together (and more regularly when he gets better - get well soon pal!). You may have seen Luke in previous blogs. I think he's been on at least two others.
He has a bit of a reputation for only cooking things he can put in the microwave. Which is not good. To pander to this though, we've decided that he should come up with a recipe that can be cooked in the microwave and would still make a decent(ish) meal. So without further ado, please enjoy Luke's Microwave Corner, Episode 1...
***
For your microwaveable potato bake you will need:
- 1kg potatoes
- 4 onions
- 4 slices bacon
- 300g mozzarella cheese
- 1pt milk
- 25g flour
- 25g butter
Start by peeling the potatoes and slicing them very very thinly - the thinner the better. The thinner they are the quicker they'll cook, which is exactly what you want.
 Do the same with the onions, and then dice up the slices of bacon. Start to layer this up in a microwaveable dish, starting with the potato, then the onion, then the bacon, and repeat. Finish with a layer of potato on top.
The next step is to make a white sauce. I couldn't think of a way of doing this in the microwave, so unfortunately this part has to break the rules slightly. It's just a standard white sauce recipe - melt the butter and flour together and then whisk in the pint of milk a bit at a time until you get a reasonably thick sauce. Crack in some pepper and salt for flavour.
 Once your sauce has thickened up, throw in the cheese and give it a good whisk to ensure that it's all melted and evenly distributed throughout. Take the sauce off the heat and pour it over the top of your layered potatoes.
 Into the microwave it goes for about twenty minutes...
 Remove carefully...
 And serve. To complete the Luke effect, you must pour on lashings of tomato ketchup and more salt.
 Not a bad start for the microwave blog - but I'm sure we can do better! Let me know if you have any ideas and I'll pass them on to Luke.
***
Coming up:
- Soufflé tomorrow... probably try pistachio and cheese.
- Still got a few bits and pieces that I can upload. I'll try to find some time to turn them into a coherent blog.
Avid readers (are there any?) might remember that I mentioned the possibility of a remote contributor to the blog. And if you don't remember, you can see for yourself by having a look at the 'Coming up' section of this blog.
Remote is probably the wrong word to use right at the moment as I'm still living in Witney, however once I move away it will definitely be a remote contribution!
All that to say that Luke is occasionally going to pop a recipe on here when he gets his act together (and more regularly when he gets better - get well soon pal!). You may have seen Luke in previous blogs. I think he's been on at least two others.
He has a bit of a reputation for only cooking things he can put in the microwave. Which is not good. To pander to this though, we've decided that he should come up with a recipe that can be cooked in the microwave and would still make a decent(ish) meal. So without further ado, please enjoy Luke's Microwave Corner, Episode 1...
***
For your microwaveable potato bake you will need:
- 1kg potatoes
- 4 onions
- 4 slices bacon
- 300g mozzarella cheese
- 1pt milk
- 25g flour
- 25g butter
Start by peeling the potatoes and slicing them very very thinly - the thinner the better. The thinner they are the quicker they'll cook, which is exactly what you want.

The next step is to make a white sauce. I couldn't think of a way of doing this in the microwave, so unfortunately this part has to break the rules slightly. It's just a standard white sauce recipe - melt the butter and flour together and then whisk in the pint of milk a bit at a time until you get a reasonably thick sauce. Crack in some pepper and salt for flavour.


***
Coming up:
- Soufflé tomorrow... probably try pistachio and cheese.
- Still got a few bits and pieces that I can upload. I'll try to find some time to turn them into a coherent blog.
Restaurant: Brasserie Blanc, Oxford
My apologies for the length of time in between blogs recently, but with the move to Scotland imminent and trying to sort out selling my house and so on, it's rather slipped down the priority list.
Having visited Brasserie Blanc last night as a little 'leaving do', I thought it must be time for a blog...
***
The Brasserie is a more affordable, homely version of Raymond Blanc's Manoir. This is not to say that the food is any less though. In fact it really was fantastic. Let me share a little with you.
As the restaurant is not particularly exclusive, I was able to get a table for four by booking only one day in advance - it is well worth booking though. We went midweek and the place was absolutely packed.
Upon arriving you are greeted by a plethora of authentic French staff - and this is one of the touches I found particularly pleasing about the place. As a French restaurant, it makes sense to have French staff front of house. The accents, the ability to pronounce the options on the menu... these things make a difference - help to add to the illusion that you might be eating in France. It's part of the show.
I must also share my appreciation for our particular waiter, ably assisting us in deciding what to choose, what drinks to pair with what food, and put up with a little humour at his and our expense. Especially Deon taking so long to choose...
And choose we did. Having been shown to the table (right in the middle of the restaurant - fantastic for people watching - especially the lady who was obviously a critic, taking notes on her iPad), we made our choices for the evening.
 Kicking off with the starters, Liz and Alta both settled for the snails in garlic butter, while Deon chose mussels and I went for Comté cheese soufflé. I had decided against mussels as they are something I have prepared before myself, and when eating out I like to go for something I wouldn't normally cook. The soufflé was delicious - the light pastry giving way to a melted cheese centre, all sitting on a bed of apple, apricot and walnuts. Not dazzling by any means, but certainly a good taster for the rest of the evening. I did have to taste the snails, never having had them before, but I found them to be not too dissimilar from mussels, perhaps having a slightly less distinct flavour (though they were buried in garlic) and a little tougher too.
 The main dishes blew away any fears of a less than excellent dining experience however. With Deon, Liz and I all plumping for Barbary duck breast, it was Alta walking alone with the beef stroganoff. I didn't try the beef, but Alta assures me it was the best she's ever had. I'd have to say that the duck was definitely the best duck dish I've eaten in my time as well. It was such a well balanced dish, with the sweet of the carrots and fatty flavour from the duck being expertly cut through by the sharp orange and lime sauce that topped them. The potato and turnip accompaniment was divine, being layered through with some sort of cheese.
 As with all good restaurants though, the puddings are always the flagship. And Brasserie Blanc is certainly no exception. Deon and I chose the steamed lemon sponge, which was absolutely fantastic. The sponge was deliciously light, and the lemon sauce was a perfect balance of sweet and sour with the crème fraiche acting as the perfect foil, stopping the lemon becoming too cloying on the pallet.
 It was the girls's choice of dessert that absolutely stole the show though. Having ordered soufflé for starter, I'd avoided ordering the sweet version for afters, but I think that was possibly a mistake - even though etiquette tells me better. If God has a flavour, it is most definitely the pistachio soufflé served up in Brasserie Blanc. This monstrously sized pudding is so light on the inside, falling away as you dig into it, and the fresh pistachio flavour coming through the eggy centre was just to die for. Who cares about the chocolate ice cream on the side? That was nothing on this wonderful creation. If you go to the restaurant for one dish - make it this one. Though it must be said that Liz is a little odd and did not like it. For shame.
 And to finish, we ordered a chocolate fondue for the table. Again, perfectly poised between sweet and bitter - the dark chocolate against the freshly baked pastries.
And it is this balance which typifies the dishes on the restaurant's menu. Be it the gherkins in the rice for the stroganoff to give extra crunch and a piquant flavour, or the aforementioned cream with the lemon pudding, there is always a nod to the refined pallet.
Pound for pound, the restaurant is more than reasonable, and the staff are flawless. All round an excellent evening as can be seen from the smiling, demon eyed faces in the badly taken photograph below...
 From left to right: Liz, Deon, Alta and myself. The man that took this photo was rather bemused... I can't say I'm surprised. Jericho at 11pm. A curious place for a group photo indeed.
***
You may have noticed a little change to the blog - I'm now running a twitter feed down the right hand side, so even if I don't blog so much, there'll always be a wee taster to keep you going. Make sure to follow me and keep yourself up to date with the happenings in my culinary world.
Once things are sorted with the house and my evenings are less packed I'll try to get a few more recipe based blogs on the go again.
***
Coming up:
- Alta and I are going to try to make a soufflé at some point. Wish us luck!
- I have a couple of other little blog ideas that should make their way to this page soon. Eyes peeled...
Having visited Brasserie Blanc last night as a little 'leaving do', I thought it must be time for a blog...
***
The Brasserie is a more affordable, homely version of Raymond Blanc's Manoir. This is not to say that the food is any less though. In fact it really was fantastic. Let me share a little with you.
As the restaurant is not particularly exclusive, I was able to get a table for four by booking only one day in advance - it is well worth booking though. We went midweek and the place was absolutely packed.
Upon arriving you are greeted by a plethora of authentic French staff - and this is one of the touches I found particularly pleasing about the place. As a French restaurant, it makes sense to have French staff front of house. The accents, the ability to pronounce the options on the menu... these things make a difference - help to add to the illusion that you might be eating in France. It's part of the show.
I must also share my appreciation for our particular waiter, ably assisting us in deciding what to choose, what drinks to pair with what food, and put up with a little humour at his and our expense. Especially Deon taking so long to choose...
And choose we did. Having been shown to the table (right in the middle of the restaurant - fantastic for people watching - especially the lady who was obviously a critic, taking notes on her iPad), we made our choices for the evening.


And it is this balance which typifies the dishes on the restaurant's menu. Be it the gherkins in the rice for the stroganoff to give extra crunch and a piquant flavour, or the aforementioned cream with the lemon pudding, there is always a nod to the refined pallet.
Pound for pound, the restaurant is more than reasonable, and the staff are flawless. All round an excellent evening as can be seen from the smiling, demon eyed faces in the badly taken photograph below...

***
You may have noticed a little change to the blog - I'm now running a twitter feed down the right hand side, so even if I don't blog so much, there'll always be a wee taster to keep you going. Make sure to follow me and keep yourself up to date with the happenings in my culinary world.
Once things are sorted with the house and my evenings are less packed I'll try to get a few more recipe based blogs on the go again.
***
Coming up:
- Alta and I are going to try to make a soufflé at some point. Wish us luck!
- I have a couple of other little blog ideas that should make their way to this page soon. Eyes peeled...
Subscribe to:
Posts (Atom)